Planar Move
Warning
Planar move is only available for Pepper.
What is a Planar Move
A Planar move is a file describing movements of the robot in a plane space.
Planar move files have a PMT extension.
A move is constituted of trajectories, and each trajectory is made of several paths, linking two poses.
When a robot executes a planar move, it does it trajectory per trajectory, marking a stop between trajectories. In contrary, within a trajectory, paths are chained continuously, hence they require to be continuous.
Choregraphe integrates everything needed for you to be able to:
- create a planar move.
- edit a move using the Planar Move Editor.
- integrate a move inside a behavior.
Creating a Planar Move
| Step | Action |
|---|---|
Choose File > Add new content > Planar move.... 
Note: you can also click the |
|
Type a file Name. Warning
|
|
Click the Add button. Your planar move is created. The file <file_name>.pmt is created and is opened automatically for edition. 
|
 Add content button
in the
Add content button
in the Planar Move Editor
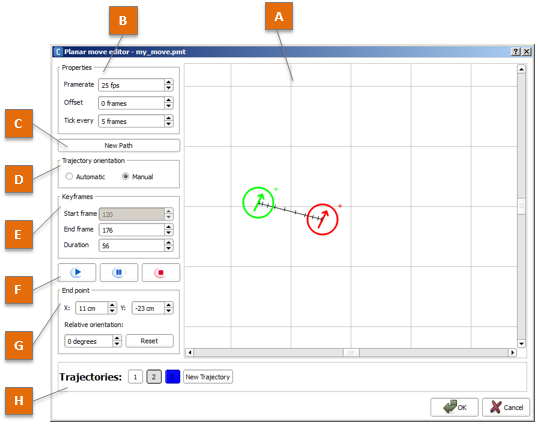
| Part | Name | Description |
|---|---|---|
| A | Edition zone | Displays the selected Trajectory(ies). Allows you to manipulate the poses and the paths.
|
| B | Properties | Allows you to set the properties of the Planar move.
|
| C | New path button | Allows you to add intermediate points on the current Trajectory. Once having clicked, move the End pose in order to extend the trajectory starting from this intermediate point. It produces arcs of circles to ensure continuous moves. |
| D | Trajectory orientation | Allows you to change the edition mode so that the orientation of the poses are computed automatically or not, in function of the direction of their leading path. |
| E | Keyframes | Allows you to fine-tune the time taken for a trajectory to be executed. |
| F | Preview buttons | Click the Play button to preview the trajectory. |
| G | End point | Allows you to fine-tune the last pose of your trajectory. |
| H | Trajectories | Allows you to add and select a Trajectory. All trajectories compounding your planar move are displayed here, each behind an index button.
|
 End pose is the red one.
 Start pose is the green one.
It cannot be manipulated.
Start pose is the green one.
It cannot be manipulated.Using Planar Moves in Behaviors
Open a Behavior, and enter the diagram you want your planar move to be executed from. Drag the *.pmt file from the project content and drop it in the diagram editor: it will create a Move Along box referring to your planar move.
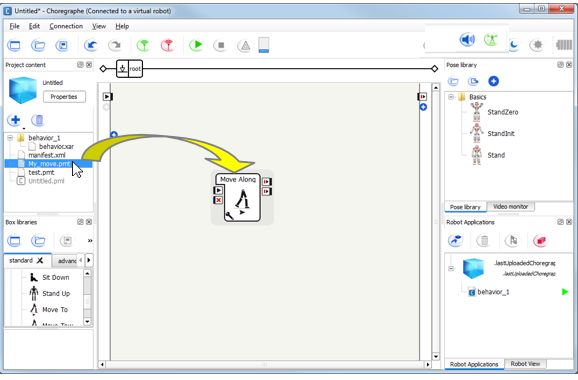
Note
you can also find the Move Along box in the Movement > Navigation box library.
You can re-use this box everywhere in your project with no additional overhead.
The Move Along box is linked to the Planar Move file: editing the Planar Move file modifies the box content.