Mastering application localization
Creating a international application
To create an internatioanl Application:
A - Set the Project properties
| Step | Action |
|---|---|
| Set the Project properties. | |
| Choose File > Project properties | |
| Select several Supported languages. | |
| Activate the Translations auto-fill for option and choose the language to use as a source text in the Translation files. | |
| Complete the Project properties for each supported language. | |
| Consider adding additional Description languages. |
B - Create translatable content
Add to your project:
new Dialogs,
new speech boxes like Animated Say, Say, etc, or
new python boxes using localized strings as parameters.
For further details see: Localized Parameter.
C - Manage the localization files
To manage the translation:
| For ... | Edit the ... |
|---|---|
| Dialog: | .top files. |
| Localized texts | .ts files. |
Localized Parameter
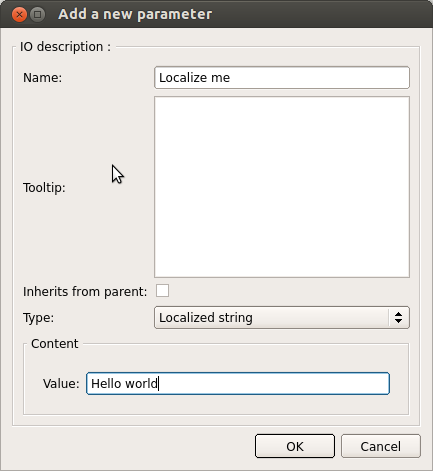
Creating a localized box parameter
Add a parameter through the box inspector.

| Part | Description |
|---|---|
| Name | The name of your localized parameter. This is part of the translation message ID, avoid to modify it, or it will create a new entry in your translations files. |
| Type | Choose Localized string. You can use it exactly like a String type parameter, the only difference is its value depends of the current robot language. |
| Value | The Value will be used as the source text to be translated across all supported language. |
Using a localized parameter
To get your translated text in a python script use it like any parameter:
value = self.getParameter("Localize me")
This will return the source text translation of your parameter in the current language of your robot. If the a translation is not available it will default to the source text of the parameter.
