Timeline
Timeline panel

| Part | Name | Description |
|---|---|---|
| A | Motion | Allows you to define Motion keyframes.
|
| B | Time ruler | Represents the time elapsing when the box is started.
|
| C | Behavior layers | Allows you to define Behavior layers to be executed in parallel with Motion Keyframes.
|
 Timeline editor button displays the
 Timeline properties button allows you to set the
  Play motion button plays the
 What is a Timeline
A Timeline enables you to easily synchronize boxes with movements, movements with each other and/or Boxes with each other.
A Timeline is constituted by:
- a Motion layer which contains movements.
- Optionally one or several Behavior layers which contain Flow diagrams NAO will execute in addition to its movements.
Timeline execution
The whole Timeline is based on a time ruler. The time is represented on the Timeline by numbered Frames. Each Frame corresponds to a position of the robot and/or Flow diagrams to execute.
When a Timeline is started, the Time cursor is placed on the Start frame. Then it is regularly incremented to the next Frame, until it gets to the End frame.
The speed to move from a Frame to another is defined by the Frame rate of the Timeline. For further details, see Timeline properties.
Note
The automatic process regularly moving the Time cursor to the next Frame can be affected (stopped, restarted, moved to another Frame) by the sub-boxes and the script of the box. For example, the Goto And Stop boxes move the cursor to a specific frame and pause the cursor so that it will not move to the next frame.
Frame ruler
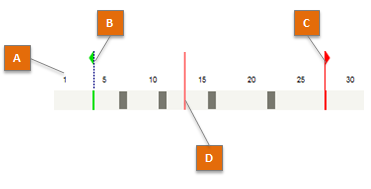
| Part | Name | Represented by ... |
|---|---|---|
| A | Frames | scale of numbers. |
| B | Start frame | a green flag. |
| C | End frame | a red flag. |
| D | Time cursor | a red line, appearing only when the Timeline is executed. |
Frames
When the Time cursor gets to a Frame, simultaneously:
- the joint values stored to this Frame are applied to the robot.
- the Flow diagram of each Behavior keyframe placed on this Frame are loaded (if they have not been loaded yet).
Start frame
The Start frame is a specific Frames.
When the Timeline is started, the Time cursor is directly placed at this Frame.
Any Frame which is before the Start frame will not be reached.
If you force the Time cursor to move on one of those Frames (with a Goto And Play box for example), this will have the same result as going to the End frame.
End frame
The End frame is a specific Frames.
As soon as the Time cursor gets to this Frame:
- The Time cursor is paused. So it stops being incremented.
- If there is any onStopped output:
Any Frame which is after the End frame will not be reached.
If you force the Time cursor to move on one of those Frames (with a Goto And Play box for example), this will have the same result as going to the End frame.
How to set Start and End frames
By default, Start frame is set to the Frame 0 and End frame is set just before the last Motion frame defined.
To move Start frame or End frame:
- Drag them on the ruler or
- Right-click on a Frame number and choose Set start frame here or Set end frame here.
To reset them to the default value:
- Right-click on a Frame number and choose Reset start here or Reset end here.
Time cursor
The Time cursor represents the currently executed Frame in the Timeline.
Value of the Time cursor
For a Timeline box, the value of the Time cursor:
- is the number of the executed Frame, or
- is equal to -1 when its Timeline has not been started or has been stopped.
For a Flow diagram box, its value is systematically equal to -1.
A Script box has no Time cursor.
How to get the value of the Time cursor
You can access to the value of the Time cursor of a Timeline box from its Script with the following command:
timeCursor = ALMemory.getData( self.id )
You can also access to it from the script of a child box with the following command:
timeCursor = ALMemory.getData( self.parentId )
Warning
A Script box has no Time cursor. So if you try to call the first command above in a script box, it will return an error.
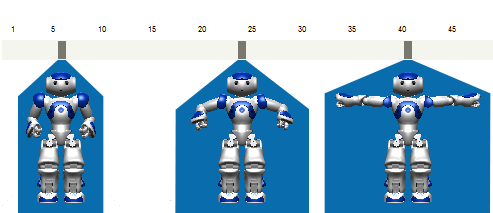
Motion layer
The Motion layer is where NAO’s movements are stored in the Timeline.
Each Motion keyframe on the Motion layer corresponds to a position of the robot or a part of its body.
Note
As there are several joints stored in this Motion layer, we can say it is made with several sub-motion layers, each of them corresponding to a joint. They are the sub-layers you can see when opening the Timeline Editor.
Motion keyframe
A Motion keyframe represents a position of the robot or a part of its body.
It contains the angle values of the stored joints.
When the Time cursor gets to a Motion keyframe, the joint values stored to this frame are applied to the robot.
Interpolation
The Motion layer contains Motion keyframe representing specific positions set by the person who made the movement.
Then an interpolation of joint values is automatically made in order to obtain intermediate positions between two Motion keyframes.
Note
You can choose the type of interpolation between the Motion keyframe in the Timeline Editor.
Editing Motion keyframes
Motion keyframes can be created and modified directly on the Motion ruler or using the Timeline Editor.
Motion ruler
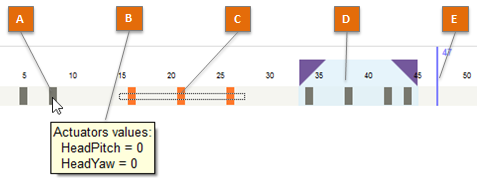
| Part | Name | Description |
|---|---|---|
| A | Motion keyframe | Each Motion keyframe is represented by a dark grey rectangle. |
| B | Actuator values | If you keep the mouse on a Motion keyframe, a tooltip appears with the values of stored joints. |
| C | Selected Motion keyframe | A Motion keyframe gets orange when it is selected. Drag a selection rectangle to select several Motion keyframes, or Ctrl-Click them. |
| D | Selected range of frames | The range of frames is an alternative mode of selecting Motion keyframes. Drag the Frame numbers to create it. |
| E | Insertion point | Represented by a blue line, the insertion point allows to create or to paste Motion keyframes. |
Creating
To insert a new Motion keyframe with the robot’s current position:
Right-click a frame in the grey Timeline and choose Store joints in keyframe.
Choose the joints you want to store the value of (Whole body, Head, Arms or Legs).
A dark grey rectangle appears, containing all the joint values of the selected part of the robot.
To create several Motion keyframes, using the real robot like a puppet, see: How to use the Animation Mode.
Selecting
To select:
a Motion keyframe, simply click on it.
The robot will automatically take the position corresponding to this Motion keyframe.
several Motion keyframes, drag and drop in the grey Timeline.
all Motion keyframes, right-click the grey Timeline and choose Selection > Select all.
Note
The option Select from layer is only useful in the Timeline Editor.
Removing
To remove the values of some joints from any Motion keyframe:
- Select one or several Motion keyframe.
- Right-click it and choose Remove joints from keyframe.
- Choose the joints you want to remove (Whole body, Head, Arms or Legs).
Moving
To move Motion keyframes within the Timeline:
- Select one or several Motion keyframe.
- Drag them.
or
- Select one or several Motion keyframe.
- Right-click it and choose Copy or Cut.
- Click on the Timeline in order to place the insertion point (see Motion ruler).
- Right-click it and choose Paste.
Note
If the Keyframe you have pasted is empty, this could mean that there is a conflict with contradictory values for the same joint at this frame.
Mirroring
The values of left and right joints can be swapped using the Mirror option in the contextual menu. Then you can select where to apply the swap (Whole timeline, Selected frames, Selected keys).
For example if the robot moves his right arm during the whole Timeline and you mirror it, then it will move his left arm from now on instead.
Spreading / tightening
to change the gap between Motion keyframes:
Select a range of frames by dragging the Frame numbers.
The selected range of frames is represented by a blue square surrounded by purple triangles.
Drag the right purple triangle to resize the selected chunk of motion layer.
Note that the left purple triangle allows you to move the selected chunk of motion layer.
Note
Since a chunk of motion layer may contain Motion keyframes, they are moved as the selection is moved. They also adapt themselves to the new size of the selection. As the size of the selection grows, the duration between Motion keyframes grows too.
Exporting C++ / Python
To export an animation to C++ or Python code:
Select one or several Motion keyframes.
Right-click them and select Export motion to clipboard.
Select a language (C++ or Python) and a mode (Bezier or simplified).
Paste it in your code.
The robot will make the same movements when this code is executed.
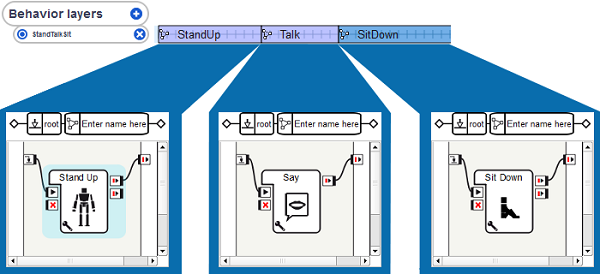
Behavior layers
Behavior layers area allows you to add Behavior layer(s) to the Timeline, which basically represent what NAO is going to do in addition to his movements.
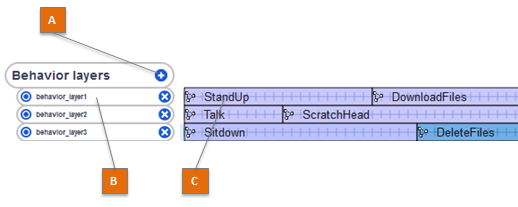
| Part | Name | Description |
|---|---|---|
| A |  Add button Add button |
Allows you to add one or more Behavior layers |
| B | Behavior layer | Click the Activation button to enable or disable a Behavior layer:
Click the name of a Behavior layer, to edit it. Click the |
| C | Behavior keyframe | Each Behavior layer can run one or several Behavior keyframes sequentially. |
 means the Behavior layer is enabled.
 means the Behavior layer is disabled,
it is hidden and will not be loaded nor executed.
means the Behavior layer is disabled,
it is hidden and will not be loaded nor executed. Delete button to delete the Behavior layer.
Behavior layer
A Behavior layer is constituted by Behavior keyframes, sequentially organized.
Creating more than one Behavior layer allows to get two Behavior keyframes active at the same time i.e. synchronize two Flow diagrams.
Behavior keyframe
A Behavior keyframe is a Flow diagram which is applied on a range of Frames of the Timeline.
Behavior keyframe execution
As soon as the Time cursor gets within this range of Frames, the Flow diagram of the Behavior keyframe is loaded.
As soon as the Time cursor gets out of the range of Frames of the Behavior keyframe, its Flow diagram is unloaded.
Adding
To insert a new Behavior keyframe in a Behavior layer:
- Right-click the Frame you want to insert the Behavior keyframe to and choose Insert KeyFrame.
- Double-click on the Behavior keyframe.
- Set its name, its start frame in the index field, and its image.
Selecting
To select:
- a Behavior keyframe, simply click it.
- several Behavior keyframes, Drag a selection rectangle around them.
- all Behavior keyframes from a Behavior layer, right-click the concerned Behavior layer area and choose Selection > Select from layer.
- all Behavior keyframes, right-click the Behavior layers area and choose Selection > Select all.
Editing
To move Behavior keyframes within the Behavior layer, simply drag them.
They can also be cut, copied, pasted and deleted through the contextual menu.
Timeline properties
The Edit button of a Timeline allows you to set the following Timeline parameters:
| Name | Description |
|---|---|
| Framerate (FPS) | Stands for Frame Per Second.
Sets the execution speed of the Timeline.
|
| Size | Size of the Timeline in number of frames. |
| Resources Acquisition | Warning The Resources Acquisition setting should not be used anymore as an improved solution has been provided which enables you to set the resources used by each box and some more settings. We recommend you to update your older behaviors and set the resources of the boxes of your behaviors. To do so, see the section How to set resources in a box. Allows you to manage conflicts between commands sent to the same joint. You can choose several modes:
|