Camera viewer
See also
The Camera viewer allows you to:
- configure robot cameras,
- display what they see,
- take pictures or
- record videos.
To load the Camera viewer plugin into Monitor, see How to launch a Monitor plugin.
Once loaded, the following panel is displayed:
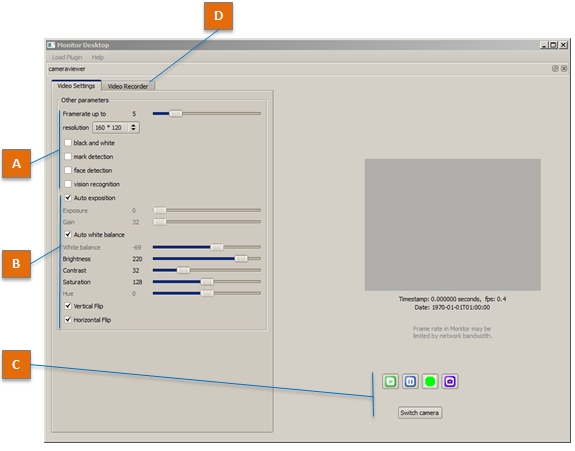
| Part | Name | Description |
|---|---|---|
| A | Viewer settings | The following settings have an impact limited to the display on Camera viewer, and has no impact on video recording: whatever the settings, videos are recorded in QVGA (320*240) at 15 fps, with MJPG compression.
|
| B | Camera settings | The following settings impact video recording and all the modules which use the cameras.
|
| C | Action Buttons | Play Pause Record Snapshot Switch camera: switches between head’s front and bottom cameras. |
| D | Video Recorder tab | This panel allows you to define the file name used to store the video on the robot. It also displays information about the last recorded video file. |
 starts retrieving and displaying images from your
robot in the video widget.
starts retrieving and displaying images from your
robot in the video widget. pauses video display and stops requesting images.
 starts recording a video.
 stop recording the video and prompts for a
destination file.
stop recording the video and prompts for a
destination file. takes three pictures (a,b,c) of what the robot
sees. The files will be saved to:
/home/nao/.local/share/naoqi/vision/{timestamp}{a,b,c}.jpg
takes three pictures (a,b,c) of what the robot
sees. The files will be saved to:
/home/nao/.local/share/naoqi/vision/{timestamp}{a,b,c}.jpg