Box - Optional components
Parameter of a box
What is a parameter
A parameter of a box is a value which enables you to slightly change the actions made by your box.
Note
You can know if a box has parameters if it has a  button displayed at the bottom-left corner of the box.
The value of the parameters can be set using the Widget to set the value of box parameters or by connecting an I/O on it.
A parameter has:
a Name which has to be unique for each box, as you access the parameter value from its name in the Scripting Python boxes.
a Tooltip which is very important.
Indeed, you only see the parameter name when you edit its value. So it can be useful to have this little tooltip to describe the purpose of the parameter.
an option named Inherits from parent.
When this option is enabled, if there is a parent box of this box which has a parameter with the same name as this parameter, then the value of this parameter will be the value of the parameter of this parent box. Then setting the value of this parameter is useless.
Note
Even if the parent box parameter has not the same type, it is its value that is taken into account.
Also, if there is no parent box with a parameter with the same name, the value of the parameter is directly taken in to account.
a Type:
Type of parameters Type Corresponding I/O type Display Boolean Dynamic 
Integer Number 
Float Number 
String String 
Attached file String 
a Default value which is the original value of the parameter if you do not change it.
Widget to set the value of box parameters
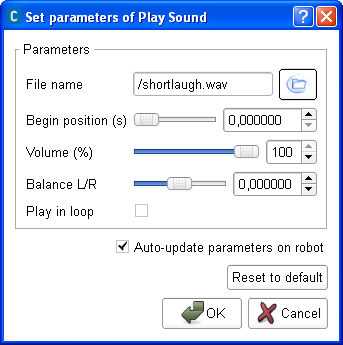
When you click on the parameter button  of a box in the flow diagram, or when you right-click on a box and select Set Parameters, the following widget is displayed:

Note
If there is no parameter button on the box, it means that the box has no parameter. So you need either to add some (right-click on the box, Edit box) or choose an other box which has parameters.
The name of the parameters are on the left and their value you can set are on the right.
You can notice in the example above that you can have several types of parameters. If you want more information about these types, see the section: Parameter of a box.
There is an option Auto-update parameters on robot at the bottom of the widget. If this option is enabled, then the value of the parameters are updated during the execution of the behavior.
For example, let’s play a long song with the Play Sound box. To know how to do this, see the tutorial: Playing music. If you set the value of the Volume (%) parameter while it is playing, then it will be updated. It would not be the case if the option Auto-update parameters on robot was disabled.
You can also reset the value of all parameters to their default value by clicking on the button Reset to default.
Parameter edition widgets
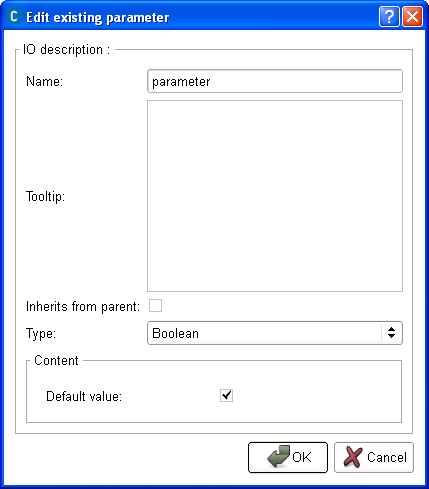
When you create or edit a box parameter, the following widget is displayed:

You can here set:
the name of the parameter.
the brief description of what effect has this parameter on the box in the field Tooltip.
Note
This description will appear in a tooltip displayed by passing above the parameter value in the widget to set the value of box parameters.
the Inherits from parent option which says if the parameter value is overwritten by the parent parameter value.
You can also choose the type of the parameter and its content depending on its type:
| Type | Content |
|---|---|
| Boolean | You can set the default value of the parameter (True or False). It is the original value of the parameter if you do not change it. |
| Integer | You can set:
|
| Float | You can set:
|
| String | You can set the default value of the parameter. You can add, edit and remove possible values of the parameter in the field Multiple Choices. Then you can set the list of possible values exclusive or not with the option Custom string possible. If this option is disabled, it is exclusive. The default value of the parameter is then the value currently displayed in the field Multiple Choices. If you did not have defined any choice in the field Multiple Choices, you can set the option Password. When this option is enabled, the value of the parameter is displayed as a password in the widget to set the value of box parameters so that each character is hidden. |
| Attached file | You can set the default value of the parameter (for example /sounds/play.wav). |
For further details about these types of parameters, see the section: Parameter of a box.
How to set the value of a box parameter
In Choregraphe some boxes such as the Motion > Walk To box have parameters, those parameters are useful for the execution of the box and need to be set.
Parameters are accessible by the two following ways:
- Click the adjustable wrench on the bottom left corner of the box or
- Right click the box and choose Set parameters in the contextual menu.
Set the parameters and click ok.
How to add/remove inputs, outputs, parameters in a box
Boxes in Choregraphe can have inputs, outputs and parameters, they are useful to communicate data between boxes.
To set box parameters:
| Step | Action |
|---|---|
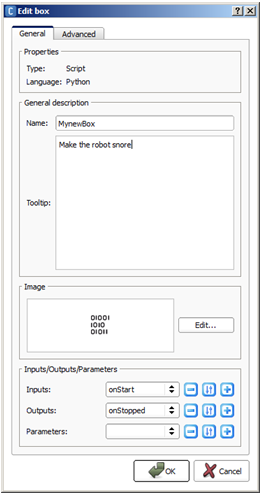
Right click a box to get to contextual menu and click on Edit box. The Edit box menu is displayed. 
|
|
| To edit or remove an item, select it in the list. | |
Click on:
This will display the Add a new input/output/parameter menu that will help you to set the properties of the input/output/parameter you are about to create.
This will display the Edit existing input/output/parameter menu that will help you to set the properties of the input/output/parameter you are editing. |
Attached files of a behavior or a box
The attached files of a behavior (or a box) are the additional files which are needed for the execution of the behavior (or the box). For example, to execute the Tai Chi Chuan dance, you need the music that goes with it.
So in order to package the behavior (or the box) with its needed files, they can be attached to the behavior (or the box) so that they automatically come with it. To see a practical example of how to attach a file to a behavior and a box, see the tutorial: Using attached files.
Warning
If you want to share a behavior which uses a specific image recognition database, you may wish to attach the database to the behavior so that NAO uses it during the execution of the behavior. But it is not possible for the time being as there is no available API to send a such database to the robot. The feature is coming soon but unfortunately for now you will have to:
- export the database using the Video monitor panel.
- share it next to the behavior.
- precise that, before executing the behavior, the image recognition database needs to be sent to the robot using the Video monitor panel.
When you drag and drop a box which has attached files from the Box libraries panel to the Flow diagram panel, the files attached to this box are added to the files attached to the current behavior.
Warning
If a file already exists in the list of files attached to the current behavior, then the old file will be replaced by the new file.
Resource of a box
A resource is an element needed for executing a task (a box or a behavior).
For example, to walk, the robot uses the resource of the legs. To dance, the robot uses the resources of the audio player, the arms and the legs.
Many resources can only be used once at a time (the legs for example). Thus you need to manage conflicts between tasks which use the same resources.
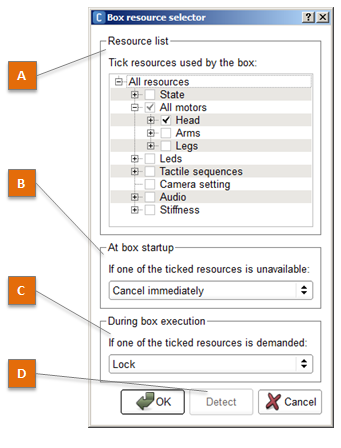
The Box resource selector allows you to set, for each box, the resources that are used, and how to manage the resources between boxes.
Managing the resources is important when exchanging behaviors for two reasons:
For resolving conflicts
Let’s say we have two behaviors:
- One makes the robot dance on a music (Tai Chi Chuan box for example).
- The second makes the robot walk when the left bumper is pressed.
If they both are running at the same time, the two behaviors may send contradictory commands to the legs.
For synchronizing resources
If your behavior makes the robot greet with the left hand and say Hello, both resources need to be available at the same time for the behavior to start.
How to set resources in a box
To set the resources of a box:
| Step | Action |
|---|---|
Right click the box and choose Edit resources. The Box resource selector appears. |
|
| In the Resource list, tick the resources or the group of resources you want. | |
Set the At box startup and During the box execution parameters. For further details see: Box resource selector. |
|
| Click the OK button. |
See also the Tutorial about the resource manager.
Box resource selector
To display the Box resource selector, right click the box and choose Edit resources.

| Part | Name | Allows you to ... |
|---|---|---|
| A | Resource list | Tick the resources that are used by your box. While they are used by your box, they will be only by your box. |
| B | At box startup | Choose what happens at the startup of the box. Indeed if one of the resources you ticked has already been taken by another box, then it is unavailable for your box. Then your box is started, it can react in different ways:
|
| C | During box exection | Choose what happens during the execution of your box. Indeed you need to choose how your box will react if one of the resources it uses is demanded by another box:
Note This is an option for advanced users only. For more information about this kind of built-in functions, see the section: Built-in functions in the script of a box.
Warning This option is deprecated since 1.14 and will be removed in later version. |
| D | Detect button | Make Choregraphe try to automatically detect the resources used by your box. Warning This function may miss some resource you use in your box. So we advise that, after clicking on this button, you make sure yourself that every resource your box uses is ticked. |
Plugin of a box
A box plugin adds a user interface directly on the frontage of the box. For example, if you choose the numberedit plugin then you will be able to choose a number directly from the box frontage instead of in parameters.
It automatically generates a Scripting Python boxes for the box which then will not be editable.
It can also be useful if you want to make specific commands during the edition of your behavior. For example, if you choose the ui_choice plugin then in advanced options (the + button) you will have a button to calculate the approximative recognition confidence of each word.
Note
We strongly advise you to use parameters instead of plugin as it is a very advanced feature to use.
 button to add inputs, outputs or parameters.
 button to remove the selected item.
 button to edit the selected item.