Getting Started
Requirements
Python 2.7 is the preferred version, but qiBuild should work fine on python 2.6, too. Note that to prepare a possible conversion to python3, python2.5 is not supported.
CMake version 2.8.3 is the preferred version, but you should not have any problem with CMake 2.6. On Windows, choose to add CMake to your %PATH%.
On windows, to use scripts written in Python, you have to put C:\Python2x and c:\Python2x\Scripts in your PATH.
Installation
Get the source code from github: https://github.com/aldebaran/qibuild
Linux
Simply run:
./install-qibuild.sh
And make sure ~/.local/bin is in your PATH
Also install CMake and the various tools for compiling
# On ubuntu
$ sudo apt-get install cmake build-essential
Mac
On Mac, install CMake from CMake website: http://www.cmake.org/cmake/resources/software.html
During CMake installation, you will be asked to choose a path to install command line links:
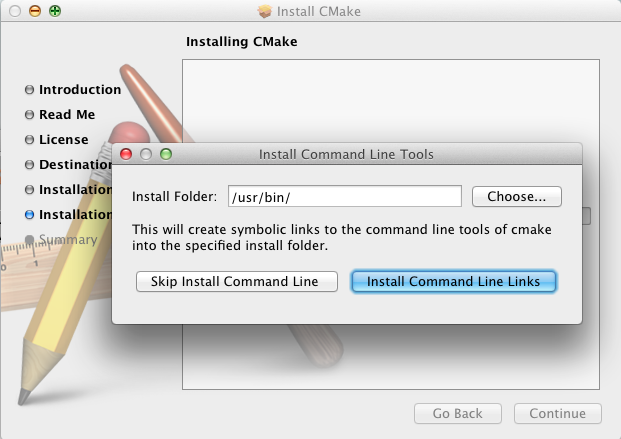
Just choose the default path.
(qibuild cannot work without CMake installed this way)
Then install XCode.
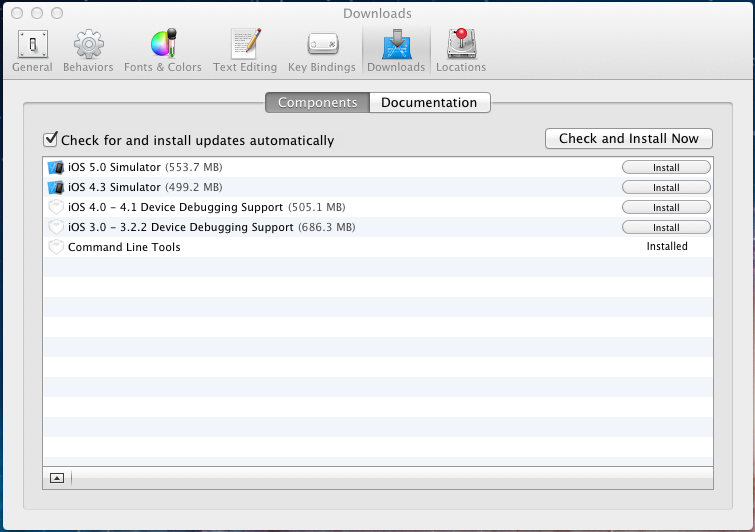
Starting with XCode4, the command line compile tools (gcc, make, and so on), are not installed by default and CMake cannot work without them.
Go to Preferences/Downloads/Components and install the command line tools form here:
Windows
Just run install-qibuild.bat:
c:\path\to\qibuild> install-qibuild.bat
If you have bash available on your system, and want to use qiBuild from there, you should also be able to use the .sh script. (Be careful if you are using cygwin: you must be sure the .sh has UNIX end of lines)
Plase make sure that CMake is in your PATH
If you’d like to have nice colors in your console, you can install the Python readline library: http://pypi.python.org/pypi/pyreadline
First run
You should run
$ qibuild config --wizard
The first time you run qibuild and then answer the questions.
A file will be generated in ~/.config/qi/qibuild.xml. It is shared by all the worktrees you will create.
You will be asked for the CMake path if qibuild does not find it, then you will be asked to choose a CMake generator.
It is advised to use ‘Unix Makefiles’ on Linux and Mac, and ‘Visual Studio’ on Windows.
Keep reading if you want to use other generators.
Note that you can still re-run the config wizard anytime you want.
Creating a work tree
You need to chose a qibuild “worktree”.
This path will be the root from where qiBuild searches to find the sources of your projects.
In the following document, we will use the notation QI_WORK_TREE to refer to this path.
Then go to this directory and run
$ qibuild init
This will create a new qiBuild configuration file in your working directory, in QI_WORK_TREE/.qi/qibuild.xml.
This file contains settings that will only used by this worktree.
If you re-run qibuild config --wizard form a directory inside your worktree, the wizard will ask you if you want to configure settings for this worktree.
Configuring qiBuild
You can run qibuild config to get a look at your current settings, and change them by editing the xml files, or re-running qibuild config --wizard
Building with Unix Makefiles
No specific configuration is needed, since this is the default behaviour. Enjoy!
Configuring qiBuild for Visual Studio
You will have to make sure CMake uses the proper generator for qiBuild to work with Visual Studio.
Here’s what a complete ~/.config/.qi/qibuild.xml would look like to use Visual Studio 2008
<qibuild version="1">
  <defaults>
    <cmake generator = "Visual Studio 9 2008" />
  </defaults>
</qibuild>
For command line addicts (or people doing continuous integration who would like a better build output), you can also:
- Use <cmake_generator = "NMake Makefiles" /> and use qibuild from the Visual Studio command prompt.
- Or, if you do not want to use the Visual Studio command prompt, you can specify a .bat file to be ran by qibuild, like this
<qibuild version="1">
  <defaults>
    <env bat_file="c:\Program Files\Microsoft Visual Studio 9.0\VC\vcvarsall.bat" />
    <cmake generator = "NMake Makefiles" />
  </defaults>
</qibuild>
(the location of the .bat file depends on your setup)
Bonus: using JOM
Get the JOM package from here: ftp://ftp.qt.nokia.com/jom and extract it, for instance in C:\Jom109
Then, add jom to you path and use MinGW Makefiles JOM generator:
For instance:
<qibuild version="1">
  <defaults>
    <env
      bat_file="c:\Program Files\Microsoft Visual Studio 9.0\VC\vcvarsall.bat" />
      path="C:\Jom109"
    />
    <cmake generator = "NMake Makefiles JOM" />
  </defaults>
</qibuild>
Bonus: using IncrediBuild
Get IncrediBuild from http://www.xoreax.com/download_center.php
Then you should:
- Tell qibuild to use incredibuild
- Tell qibuild how to find BuildConsole.exe (a tool to use incredibuild from the command line)
For instance:
<qibuild version="1">
  <build incredibuild="true" />
  <defaults>
    <env
      path="C:\Program Files\Xoreax\IncrediBuild"
    />
  </defaults>
</qibuild>
Configuring qiBuild for Eclipse CDT
Eclipse supports having distinct directories for the source and the build, but does not like if the later is a subdirectory of the former.
So you have to use a global build directory, by editing QI_WORK_TREE/.qi/qibuild.xml to have
<qibuild version="1">
  <build build_dir="/path/to/build/directory" />
</qibuild>
Your project build directory will then be /path/to/build/directory/build-<config>/<project-name>.
Or, if you chose a relative path, it will be relative to the worktree.
You can also run qibuild config --wizard like this:
$ qibuild config --wizard
:: Do you want to configure settings for this worktree (Y/n)
y
:: Do you want to use a unique build dir (mandatory when using Eclipse) (y/N)
y
:: Path to a build directory
~/workspace/build
Will use /home/john/workspace/build as a root for all build directories
$ cd QI_WORK_TREE
$ qibuild configure
Then from within eclipse, go to “File -> Import” then choose “General -> General Projects into Workspace” and select your build directory as “root directory”. Let the “Copy projects into workspace” box unchecked and click “Finish”.
Configuring qiBuild for QtCreator
on Unix
No specific configuration is needed, since QtCreator loads the CMakeList.txt directly. Enjoy!
Just run qibuild configure by hand first, and choose the build directory generated by qibuild when the CMake wizard asks for one.
on Windows
The preferred way to use qibuild on Windows is with Visual Studio, and please note that Aldebaran does not provide a C++ SDK for mingw.
But, if you do not want to use Visual Studio, you can still use qibuild with QtCreator and the mingw package that comes with it.
- Get the latest qtcreator and install it. (you only need the qtcreator package, no need for the full-fledged Qt SDK)
- Add the MinGW’s path to your %PATH% so that QtCreator can find mingw32-make without running qmake
- Tell qibuild to use “MinGW Makefiles”
Here’s what a complete .config/.qi/qibuild.xml would look like to use MinGW with QtCreator
<qibuild version="1">
  <defaults>
    <env path="C:\QtSDK\mingw\bin" />
    <cmake general="MinGW Makefiles" />
  </defaults>
</qibuild>
Warning
qibuild never modify os.environ globally, so the executable you just built won’t run unless you have mingw’s DLLs in your PATH, but it should run from QtCreator without problems
Configuring qiBuild for MinGW with Msys
You will have to do several things for qibuild to work with MinGW.
- Set PATH properly so that make.exe and gcc.exe are found
- Make sure CMake uses the correct generator
Here’s what a complete .config/qi/qibuild.xml would look like to use MinGW
<qibuild version="1">
  <defaults>
    <env path="C:\Mingw\bin;C:\MinGW\msys\1.0\bin;" />
    <cmake generator = "Unix Makefiles" />
  </defaults>
</qibuild>
Note
here you have to setup a complete msys environnement before being able to use qibuild.
Configuring qiBuild for XCode 4.0 and latest
First of all you need to intall XCode4.
- You must have a developper account to download the command line tools after installing XCode. Preferences -> Download -> Components -> Command Line Tools
- Install the latest CMake from http://www.cmake.org/cmake/resources/software.html using dmg image. At the end of the install, install Command Line Links:
- You may have the following error:
xcode-select: Error: No Xcode folder is set. Run xcode-select -switch <xcode_folder_path> to set the path to the Xcode folder.

To fix it, open Terminal and configure your XCode4 using the following command:
$ xcode-select -switch <xcode_folder_path>
Note
Your <xcode_folder_path> should be /Applications/Xcode.app/Contents/Developer