Removing NAO‘s head
Why removing the head
You will need to remove the head of your robot if:
- your robot does not turn on,
- you want to change the head, or
- the support asked you to do so.
Removing the head
To remove the head:
| Step | Action |
|---|---|
Make sure your robot is:
Wait 60 seconds in order to be sure all electronic capacitors are depleted. |
|
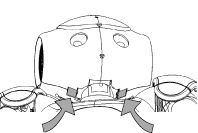
Find the head lock buttons. To do so, run your fingers under the head: you’ll feel square lock buttons on the left and right of the neck. 
|
|
| Firmly grip the head on either side of the robot’s face, and push up on the two lock buttons, making sure they are fully pressed in. | |
Now lift off the head. There should be no resistance. If it is difficult, push the lock buttons up more firmly. |
Replacing the head
To replace NAO‘s head:
| Step | Action |
|---|---|
| Align the cross-shaped hole of the head with the cross-shaped neck. | |
Push down. You should make sure that the head fully clicks in; both buttons should snap back into place. |
|
Without pressing either lock button, gently attempt to lift the head up to ensure a solid connection. The head should be secure. If not, repeat the process and be more careful with your alignment. |
